Welcome to the Ex-Official Blog of Writer, Presenter & Crafts Expert Momtaz Begum-Hossain which stopped being active on 31st August 2016.

For more regular updates follow Momtaz on Twitter: @TheCraftCafe Instagram: @The_CraftCafe Vine: @TheCraftCafe Periscope: @TheCraftCafe Snapchat: Momtazbh

For workshop bookings, writing commissions, presenting jobs, craft project designs, or any kind of enquiry email contact@momtazbh.co.uk

Momtaz's NEW BLOG is www.craftandtravel.com


Showing posts with label paper plate. Show all posts

Sunday, 25 April 2010

Look what the postman delivered!

Yipeeee! For the first time in ages the postman delivered some interesting post !

Exciting post No 1:
Yesterday I received this box from Dylon.


Inside was a stripy tee and box of Colour Catcher:


It's a product that stops your colours running in the wash. Whenever I've lived in shared houses people always seem to do 'light' or 'dark' washes and as the letter I got with the box states, what do you do when you have a spotty dress or stripy top that's both light and dark???? Hmmm...........Well apparently you buy this product which works wonders by trapping loose dyes so that your clothes don't get ruined. Thank you Colour Catcher team for sending me the gift but I won't be using it (though I may wear the free t-shirt!)

You see I think washing lights and darks separatley is a myth, I have never done a separate wash for lights and darks, I bung them altogether and touch wood have never had any problems. Maybe I am just lucky, but with my colourful wardrobe, I should know about washing colourful clothes and I can honestly say, it's fine to mix!

I've never had problems washing my colourful clothes!


Exciting post No 2:

A couple of weeks ago I was invited to take part in an Art Exchange by Jo Cheung- it's a bit like a chain letter where you put your name and address on an email that gets sent around and within a few days you should receive 36 free pieces of artwork. Well, I received just one but it was lovely nonetheless (although it would have been extremely fun to have got more!)
Here it is:


First of all it just seemed liked lots of pretty business cards - these were for my artist Kate Lynch who liked to make cards and things from recycled materials. But then I realised it was actually an amazing stitched decoration, here's what the label said:

Recycled Decorations
Made from a variety of recycled papers and beads - ideal for brightening up any space . Hang, drape or pin up anywhere!

It's very pretty and consists of punched out shapes which have been sewn together but still retains a dangle factor. It is like a strand from a beaded curtain but much more delicate, a whole room of them would look rather spectacular. Kate also has a blog so I can keep track of my new artist friend! Art Exchange was great concept and I would happily do it again as it's a great way to get quirky handmade things for free, or in my case just thing!

Now, where to hang it??


Tuesday, 20 April 2010

Pretty in Peacock

Ever since I ran a Paper Plate Peacock crafting session at the Geffrye Museum a few weeks ago, I have become obsessed with peacock colours. I’m drawn to pretty purples, gorgeous greens, brilliant blues and terrific turquoises. Not only am I currently dressing in these colours, I’m also eating and drinking them too! I’ve even had purple streaks put into my hair to break up the red! Yes, these are my colours of the season and to entice you into my way of thinking I thought I would share my peacock crafting with you. It’s a fun, cheap project to do with children. I made mine into a wall hanging but some of the kids who came to my class extended the ribbon hanger and wore them around their necks creating a peacock costume.

What you need:

Paper plates
Peacock coloured papers – green, purple and blue, shiny and non shiny
PVA glue
Pencil, scissors, hole punch
Ribbon
Goggly eyes

Body on main plate with the beginnings of the feather

Step 1: Create feathers
Fold a paper plate in half and draw oval shapes from the fold line up until the edge of the plate where tip of the oval should be. These will vary in size, some will be small and others much longer. You’ll need about 18, with a few additional smaller ones to fill in gaps. Lay each feather onto green paper, draw around, cut out and glue on so that each feather is covered.
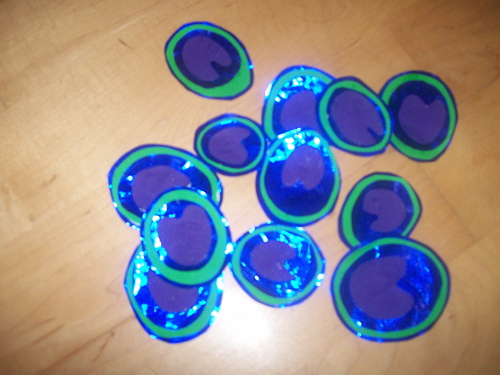
To create the ‘eyes’ draw different size circles in the different papers and glue these on in layers, ensuring the centre-piece is shaped as shown. Stick these onto the tops of the feathers.

Peacock eyes made by layering circles of coloured paper
Step 2: Create body
Draw the peacock body on shiny blue paper and glue in the centre of your main plate. Arrange the feathers around the peacock and glue in place, fill in gaps with smaller feathers as needed.

Step 3: Finishing touches
Make a beak from orange paper and glue on the body along with two goggle eyes.
Punch two holes in the back of the plate and feed a ribbon through, tying together to form a hoop so you can hang your peacock.

Mine is dangling from my living room window and makes me smile in the mornings. Every home needs one, make yours today!