Welcome to the Ex-Official Blog of Writer, Presenter & Crafts Expert Momtaz Begum-Hossain which stopped being active on 31st August 2016.

For more regular updates follow Momtaz on Twitter: @TheCraftCafe Instagram: @The_CraftCafe Vine: @TheCraftCafe Periscope: @TheCraftCafe Snapchat: Momtazbh

For workshop bookings, writing commissions, presenting jobs, craft project designs, or any kind of enquiry email contact@momtazbh.co.uk

Momtaz's NEW BLOG is www.craftandtravel.com


Thursday, 29 April 2010

Making and Teaching


As you know I love making stuff but I also like helping other people make stuff too! As a community artist and artist educator I get to work all over London with all sorts of people from different communities, ages etc.

For the last three years I have been working on the Geffrye Museum's Asian Women's project to engage the women of Hackney in East London with the museum. So far there have have been two groups, the first are an over 50s group who have lost their husbands and their children have grown up, so meeting up is an important part of their social life. They are all very lovely and so creative. Most of the time I just give them materials and they instinctively know what to do with them!

The second group is a younger Asian Women's group who live in a local estate. They are mainly in their 20s and don't work, so while their children are at school, they meet up and do craft activities together.

This Spring I worked with both groups to create an installation in the museum inspired at the recent Maharaja: the Splendour of India's Royal Courts exhibition at the V&A with the concept of creating a modern day Moghul living room. The groups created soft furnishings using hand embroidery, applique, sewing and painting.


The pieces aren't stereotypically Asian looking, they have a very modern East/West twist to them, representing the women's own lifestyles.


We started with an embroidery project, using different stitches to create a group wall hanging displayed at the back and then the women worked on individual projects for their own homes.


The quality of the work was amazing, one lady claimed she'd never done embroidery before but had seen her sisters do it and came up with this remarkable floral design! Wow! For most of the women it was the first time they had done any embroidery in ages but old school memories of learning the skill came flooding back to them in no time.

The installation is still on display at the museum in the downstairs art rooms so pop in and see it if you can!

Sunday, 25 April 2010

Look what the postman delivered!

Yipeeee! For the first time in ages the postman delivered some interesting post !

Exciting post No 1:
Yesterday I received this box from Dylon.


Inside was a stripy tee and box of Colour Catcher:


It's a product that stops your colours running in the wash. Whenever I've lived in shared houses people always seem to do 'light' or 'dark' washes and as the letter I got with the box states, what do you do when you have a spotty dress or stripy top that's both light and dark???? Hmmm...........Well apparently you buy this product which works wonders by trapping loose dyes so that your clothes don't get ruined. Thank you Colour Catcher team for sending me the gift but I won't be using it (though I may wear the free t-shirt!)

You see I think washing lights and darks separatley is a myth, I have never done a separate wash for lights and darks, I bung them altogether and touch wood have never had any problems. Maybe I am just lucky, but with my colourful wardrobe, I should know about washing colourful clothes and I can honestly say, it's fine to mix!

I've never had problems washing my colourful clothes!


Exciting post No 2:

A couple of weeks ago I was invited to take part in an Art Exchange by Jo Cheung- it's a bit like a chain letter where you put your name and address on an email that gets sent around and within a few days you should receive 36 free pieces of artwork. Well, I received just one but it was lovely nonetheless (although it would have been extremely fun to have got more!)
Here it is:


First of all it just seemed liked lots of pretty business cards - these were for my artist Kate Lynch who liked to make cards and things from recycled materials. But then I realised it was actually an amazing stitched decoration, here's what the label said:

Recycled Decorations
Made from a variety of recycled papers and beads - ideal for brightening up any space . Hang, drape or pin up anywhere!

It's very pretty and consists of punched out shapes which have been sewn together but still retains a dangle factor. It is like a strand from a beaded curtain but much more delicate, a whole room of them would look rather spectacular. Kate also has a blog so I can keep track of my new artist friend! Art Exchange was great concept and I would happily do it again as it's a great way to get quirky handmade things for free, or in my case just thing!

Now, where to hang it??


Tuesday, 20 April 2010

Pretty in Peacock

Ever since I ran a Paper Plate Peacock crafting session at the Geffrye Museum a few weeks ago, I have become obsessed with peacock colours. I’m drawn to pretty purples, gorgeous greens, brilliant blues and terrific turquoises. Not only am I currently dressing in these colours, I’m also eating and drinking them too! I’ve even had purple streaks put into my hair to break up the red! Yes, these are my colours of the season and to entice you into my way of thinking I thought I would share my peacock crafting with you. It’s a fun, cheap project to do with children. I made mine into a wall hanging but some of the kids who came to my class extended the ribbon hanger and wore them around their necks creating a peacock costume.

What you need:

Paper plates
Peacock coloured papers – green, purple and blue, shiny and non shiny
PVA glue
Pencil, scissors, hole punch
Ribbon
Goggly eyes

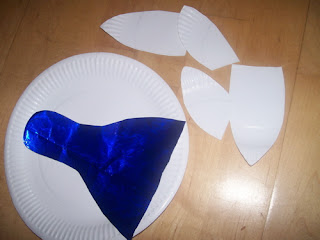
Body on main plate with the beginnings of the feather

Step 1: Create feathers
Fold a paper plate in half and draw oval shapes from the fold line up until the edge of the plate where tip of the oval should be. These will vary in size, some will be small and others much longer. You’ll need about 18, with a few additional smaller ones to fill in gaps. Lay each feather onto green paper, draw around, cut out and glue on so that each feather is covered.
To create the ‘eyes’ draw different size circles in the different papers and glue these on in layers, ensuring the centre-piece is shaped as shown. Stick these onto the tops of the feathers.

Peacock eyes made by layering circles of coloured paper
Step 2: Create body
Draw the peacock body on shiny blue paper and glue in the centre of your main plate. Arrange the feathers around the peacock and glue in place, fill in gaps with smaller feathers as needed.

Step 3: Finishing touches
Make a beak from orange paper and glue on the body along with two goggle eyes.
Punch two holes in the back of the plate and feed a ribbon through, tying together to form a hoop so you can hang your peacock.

Mine is dangling from my living room window and makes me smile in the mornings. Every home needs one, make yours today!


Sunday, 11 April 2010

Waking Up In The Land of Glitter


I'm the kind of person who always has a 'To Do' list the same size as my height. I even have a separate 'To Do When I'm Ill' list to the extent that I wish I was ill just so I could do some of those things - they tend to be the fun stuff that I wish I could do every day but feel guilty doing them as I should be working instead. Well this weekend I actually fell ill and so rather than doing my usual 
( I had three articles to write) I decided to turn off my computer and head to bed with a good book - No 1 on my list of things to do when I'm ill!

Reading 'Waking Up in Land of Glitter' made being ill so worthwhile - it is a truly inspirational book and has given me a whole new motivation and energy for life. Sometime I am so caught up in deadlines and paying bills  that I forget to stand back and do things like appreciate my friends and indulge in what I love doing most which is making stuff and this book reminded me of those things.

It is written by my all time craft heroine The Crafty Chica, Kathy Cano-Murillo. She is an absolute legend of the craft world and everything I aspire to be. She's a writer and artist and like me a sexy Saggitarian, the author of several fantastic craft books, hosts crafty TV, sells her own range of crafty projects, runs crafty holidays, has two children and 5 pets and has managed to squeeze in writing craft themed fiction, which is what this is. 

A book about three women who all have different relationships with crafts and it follows their friendship, love and family lives. It's a truly complete novel, all tied up with no loose ends - a vivid insight into characters who just seem so real. The attention to craft detail is so endearing, the craft references are in every page of the book and it's so exciting and enticing to read.

I have wondered many times if I could ever write crafty fiction - it's always appealed, I've written some drafts but nothing I would ever want to share with anyone. But looking at Kathy's writing blog which she runs alongside her fabulous crafty blog I feel so inspired. She has just finished her second crafty novel which she sat down and wrote in a mere few weeks just through sheer determination and discipline. You always hear people say things like 'anythings possible', 'if you work hard you'll really achieve your dreams' etc and it sounds so cliched but so what, it's better to be inspired by such positivity then not try and be who you want to be.

I feel proud to have this book on my shelf, and I aim to bring myself back to it every time I have any self doubt. I have goals and ambitions and  when they seem a million miles away I'm going to think of Kathy's dedication for the book 'to all the creative individuals out there who have a vision to do something great. Whether it's on a public or private scale, I hope that the characters in this book will inspire you to reach your goals....remember no idea is too big or too crazy.'

Thanks Kathy x

Sunday, 4 April 2010

Hmmm, delicious new crafty book!

A couple of months ago my friend Kesh and I wondered into The Whitechapel Art Gallery bookshop where I discovered the most amazing book I've seen in ages - it was, love at first sight: 'My Wonderful World of Fashion' by Nina Chakrabarti is an activity book for grown ups (well it's 'aimed at young girls' but personally I think grown ups will appreciate it more) with a crafty twist.

At the time of discovering the book, I was £12 away from being in overdraft so sadly I couldn't buy it. But I promised myself that as soon as I get paid I will treat myself to it and that day came on Thursday last week and I'm now the very proud owner of this fantabulous book!

Here is a sneak preview of the contents:


Tips on how to customise your clothes


Projects to make like 'things to do with lace'


Fun colouring in


Educational fashion pages


Pages on which you can draw your own designs such as this 'draw you own fingerless gloves section'


Random pink pages - this one explores tartan


I recommend this book to everyone who likes being creative - it's especially perfect for people who don't always have time to make stuff but want to, and it's also the ideal book to travel with - beats Sudoku anyday - just remember to pack some felt pens too! (Oh and by the way it's also EXTREME value for money, it retails for just £12.99 so buy or start saving up for it now!)

Saturday, 3 April 2010

Bollywood Easter eggs

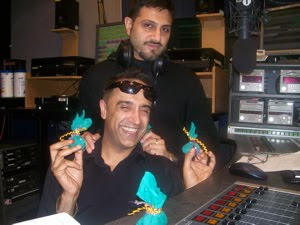
When it comes to giving Easter gifts it's not just the chocolate that matters, presentation is everything and who needs another cardboard box? Personalising your chocolate eggs is much more impressive - take them out of their original wrappers and decorate them in your own style - my favourite is jazzing them up with the bling factor for a true Bollywood flavour and who better to give them to than my favourite Bollywood Experts Raj & Pablo. This morning I reviewed a new Bollywood film called Sadiyaan - on their fabulous show 'Love Bollywood' on the BBC Asian Network, unfortunately the film was disappointing but luckily the eggs weren't, and here's how I did them.


They started life as Smarties eggs which I took out of their bulky plastic case and re wrapped in silver foil.
Next up I encased them in crepe paper and taped around the top edge to secure.

Then my fave bit, I consulted my collection of ribbons and trims and tied the most sparkliest around each egg, then finished them off by gluing sequins and gems.

And here are the lovely lads with their Bollytastic eggs!