Welcome to the Ex-Official Blog of Writer, Presenter & Crafts Expert Momtaz Begum-Hossain which stopped being active on 31st August 2016.

For more regular updates follow Momtaz on Twitter: @TheCraftCafe Instagram: @The_CraftCafe Vine: @TheCraftCafe Periscope: @TheCraftCafe Snapchat: Momtazbh

For workshop bookings, writing commissions, presenting jobs, craft project designs, or any kind of enquiry email contact@momtazbh.co.uk

Momtaz's NEW BLOG is www.craftandtravel.com


Showing posts with label easy. Show all posts

Sunday, 6 March 2016

How to make Bollywood Chocolate Easter Eggs


You've heard of Boiled Eggs...well these are Bollied Eggs: chocolate Easter eggs with a Bollywood theme. Completely edible, I made them by sticking edible picture onto chocolate eggs, then decorated them with edible glitter, edible gemstones, edible flowers, edible glue and even edible paint which I got from my local craft store Hobbycraft.

How to make your own Bollywood Easter eggs


Materials you'll need to make Bollywood chocolate eggs

First up, choose which stars you want to immortalise in chocolate and save the images as jpg files. I emailed my images to a UK based company called Icing Pictures. You send them the images you want printed, they print them onto edible icing and post them back to you. It's a really easy service, they even re-size the images for you. I had six images printed onto one sheet of A4 and it cost £9.99 including postage and packaging. I'm guessing this service exists in other countries - even your local bakery might be able to help. 
Edible images, cut out 
Next up decide on your eggs. The easiest method is to buy ready made eggs, or if you're feeling adventurous you can melt chocolate, pour into a mould and make your own eggs. I tried this method and discovered that a) you need to use a lot of chocolate as when you melt down a bar, you're not left with much and b) I couldn't get the eggs to come out of the moulds easily. If you're already a chocolate maker you may know the knack, but after ending up with broken shells I decided to stick with the easy option and buy the eggs.


Chocolate egg-making fail

Apply the image to the egg. Instructions for the brand of edible picture you use may vary, but the type I bought involved cutting it down to size... 


peeling off the backing and wetting the back with a little water...


...then smoothing it onto the chocolate shell. It's a delicate operation so be patient. Too much water and the image will disintegrate and too much smoothing and it will erode off, so practise a few times before you go through with any final designs.


Once the image is on, the fun part begins: the decorating. 
Here are some ideas.

The Item Girl egg


Bollywood movies wouldn't be the same without a song and a dance. The most innovative and best-loved Item Girl in history is Helen, a cabaret star who starred in numerous movies in the 60s and 70s. She was one of a kind, with great style, so I created an elaborate, colourful, vintage inspired egg embellished with sugar flowers.

The Bejewelled Devdas egg

When it was released in 2002 Devdas starring former Miss World Aishwarya Rai-Bachchan was the most expensive film made in Bollywood history, costing over $7million. Lavish in every way, from the extraordinary costumes to the grand, colourful sets, I painted this egg in edible gold/copper paint then stuck on edible jelly jewels held in place with icing pens. I also outlined the image with icing spots.


The Simple Salu egg

Affectionately known as Salu, Salman Khan is my favourite of all the Khans in the filmi fraternity. He has incredible charisma on the screen and I always look forward to his films for their entertainment value. I kept this one simple with a touch of icing - I was going to apply silver balls but decided they just weren't needed in the end. He alone holds the attention. 

The Randeepian egg


I'm a Randeepian and proud - a dedicated follower and fan of actor Randeep Hooda, one of the most popular actors of the moment and undoubtedly the hottest, hence the reason I positioned him inside an iced heart and added white chocolate hearts which I decorated with edible glitter and icing - one I can't wait to take a bite into!


The Blockbuster egg

Dilwale Dulhania Le Jayenge is the most famous Bollywood movie in history and one of the best. Released in 2015, 20 years on it's still playing in cinemas - no other film can claim that. The leads are played by mega stars Shah Rukh Khan and Kajol, and this is a classic film poster shot. 


Not a Bollywood fan? You can get any image printed onto edible paper from pop stars to pets. 


Top tips

  • The icing pens take around 24 hours to dry so make them in plenty of time before you need to give one as a gift.
  • While decorating the egg, sit it in an egg cup as that way you can access all sides of it easily.
  • If you are giving them as a gift try placing them in cellophane and tie up with ribbon.

Materials

My images were printed at www.icingpictures.co.uk.

All other materials used for this project were from my local branch of Hobbycraft:
Sugar flowers, edible glitter, icing tubes, edible paint, chocolate hearts, edible gemstones.

The chocolate eggs and giant green and yellow iced spots on the DDLJ eggs were from Asda, but you'll find all of the above online or in cake supplies shops. 


Happy Bollied Egg Making!


Wednesday, 6 August 2014

Festival Of Love At The Southbank Centre

Say It With Flowers tablecentres made at my workshop

If there's one thing I'm certain about in life it's that I will never get bored of The Southbank. It's my favourite place in London so it was a real honour to be invited to run two craft workshops as part of their summer Festival Of Love. 
The Festival explores and celebrates seven kinds of human love and each weekend there are events focusing on that type. My sessions took place over their Pragma Weekend celebrating 'Enduring Love'. 
Temple Of Agape
For last year's Festival of Neighbourhood the Southbank was decorated with colourful flags created by Bob and Roberta Smith and this summer the rainbow theme continued with this incredible staircase - The Temple Of Agape which you can walk up and down while admiring. Made up of hand-painted signs it's the kind of installation you can stare at for hours, but's it's not the only one...
As a girl obsessed with neon signage I love this area based inside the Southbank's Festival Village which doubles up as a bar and exhibition space. Step inside to discover a retro wonderland.
One of the workshops I ran was making 'Gifts Of Love' using letter beads to write a message to someone special. The idea was to take two heart shaped pieces of felt, stitch them together, fill with wadding and add a piece of ribbon to hang them up with. They were then decorated with words, sequins, gems, glitter and fabric scraps. 
The workshop was attended by different types of people; children, teenagers, adults and older folk - men and women, as well as friends and families. In fact my sister brought my nieces and nephew along and they all made a heart for each other.
This pair of hearts were made by a boy of seven and a family friend who was looking after him. 
One of the main features of the weekend was a special lunch that took place inside The Clore Ballroom which was attended by 100 invited guests - all of whom have a connection with Enduring Love. The guestlist included young carers, couples who've been married a very long time and people from care homes around London. To make their lunch experience extra special I was called upon to create tablecentres - made with the help of public participants.
The concept was to make something based around flowers so I decided on topiary style trees which in the end turned into cactuses, but more on that later! I picked up 10 plant pots from Poundland and my starting point was to paint them with acrylic paint - it took three layers to get good coverage.
I did some of the other prep at home too - spraying large polystrene balls with adhesive spray and smoothing squares of hessian and cotton gingham fabric over them. It was a quick and effective method but it ruined my nails so if you fancy trying this yourself I recommend wearing gloves. I bought wooden dowels to fix into the balls but my hacksaw broke when I went to cut them to size so I used straws initially but they didn't hold the weight of the balls so in the end I chopped them off and created cactuses instead!
The main session was a public drop-in craft workshop where participants made fabric and card flowers. These were then glued to the polysterene balls which were glued inside the plant pots. The 10 tablecentres were then placed on the dining tables for the special lunch on Sunday.
Elsewhere around the space there are so many more exhibitions and installations to discover and be amazed by.There's a full list on the Southbank website.


Alongside the workshops and exhibitions there are also a number of film screenings of classic romances...
And if you're visiting over the weekend be sure to show your stomach some love too by eating at Real Food Market. My favourite stalls are the two dosa stands. One is by Horn Ok Please! who create delicious, fluffy Masala Dosas served with chickpeas and bhel puri - it's a perfect light lunch or snack (£5) or if you like your food flavoursome and filling try the satisfying dosas from Dosa Delhi which are served with a very delicious coconut chutney (£6). Finish with a stop off for frozen yoghurt aboard the bright pink Snog bus (only downside being it's rather pricey ), but a nice treat and you get to sit on deckchairs or enjoy your yoghurt up on the top deck.


If you're visiting London this summer stopping off to see The Festival Of Love is a must, especially as films aside, it's FREE! Chill by the river, put your feet in the sand, relax in The Southbank roof garden, get married (there is actually a whole weekend dedicated to weddings) and take some time out to enjoying thinking about and enjoying love, whether it's on your own or with someone special. 

The Southbank Centre's Festival Of Love runs until 31st August 2014. 

Sunday, 15 July 2012

How To Make Batman Gauntlets

It is no secret that I want to be Bat Girl. It's the only job I would give up writing and crafting for - I know it's supposed to be a dual identity but I'd be happy to be Batgirl all day long. And with the new Batman movie The Dark Knight Rises launching this week I realised I needed to get my costume in order!
The Batsuit has 'his & hers' versions: they both have the tight pants, a utility belt, cape, mask, logo on the chest...and some gauntlets for the arms, And that's what I needed to complete my look! Follow these simple instructions to make your own in a matter of minutes. Be quick! There are criminals out there waiting to be challenged!
To make Batman/Batgirl gauntlets, you will need:
  • A4 black craft foam (also called neoprene or funky foam), 3 sheets
  • Scissors
  • Double-sided tape
  • Ruler
  • Paper
  • Pen
  • Velcro (self-adhesive)
1. Fold a sheet of foam over your wrist to get an idea of how tight you need to make it. A snug fit is essential and remember the higher up it goes the wider your arm will get, so adjust accordingly. Place one piece of your velcro on the outside edge, and the second half inside at the point the foam goes over your arm and trim off any excess. Do this twice.
2. Draw your 'spikes' on paper using your ruler, cut them out and use them as templates to cut from your third piece of foam. Remember you need two of each size and they vary: large, medium and small.
3. Wear the foam sleeve, to work out where the spikes need to be positioned, make sure they are pointing up.  Affix in place with double-sided tape so they stand up at the edges of the sleeve. Stick three more on the other sleeve so the gaunlets mirror each other.
 4. And there you have it! A costume essential to wear when you go and watch the movie. 
If like me you're a Batfan that fancies a recap of the previous two movies before number three of Christopher Nolan's comes out, then head to the Prince Charles cinema in Leicester Square London this Tuesday where they are having a double bill AND they're showing the original 1966 version soon too. KAPOW!!!

Now lets go save the planet!

Friday, 4 May 2012

Move over cupcakes: The humble biscuit is back!

Does anyone else remember the TV advert London Needs Biscuits? It was short-lived but I'm pleased to say it's finally been posted on You Tube! The story goes like this:
London is a cold & miserable place where no one smiles....until Fox's comes along and saves the day with their baked treats. These days the UK is infatuated by cake. I'd never say no to a slice of sponge, but when people think cakes are superior to biscuits I disagree. The biscuit is the tea drinker's best friend after all, you can't dunk a cupcake. Possibly the most sociable of all snacks, is the candy shaded, icing coated Fox's Party Ring. Greater spotted at children's parties, it's a design classic. One that evokes the most happiest of memories. Trouble is, eating one when you're an adult isn't the same. They don't dunk as well as other biccies. I've come to the conclusion that they are best reserved for crafting where their aesthetic beauty can be properly appreciated....and hey, they make for far more attractive beads than the those teeny tiny candy necklaces which worrying are these days sold as thongs & nipple tassels ...
To make a party ring necklace you will need:
  • A pack of party rings (these cost me 50P in Waitrose*, so I suspect they are cheaper in Asda, Iceland etc...?)
  • Scissors
  • Ribbon (assorted)

Inspect your biscuits - eat any broken ones. Regrettably there were no injured ones in my pack...
...but I did discover that they don't seem to match the wrapper which was disappointing.
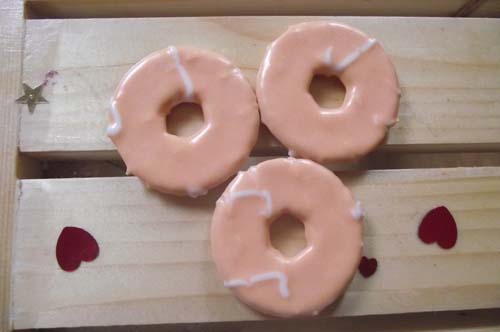
I also I regret to announce that none of the peach ones were selected - what went on with the icing here??!
Arrange an order you're happy with.

Before you start you'll need to cut your ribbon strips cut into 20cm lengths.
Take your first two biccies.
Feed a piece of ribbon through the first two and tie a double knot so it's nice and tight.
Attach the third biscuit in the same way.
When you're done the back will look like this. Trim the ends. Don't worry if it feels delicate it's actually a strong structure and the icing is so solid, it won't chip so you can tie the ribbon as tightly as you want without fearing the cookies will snap.
The front will look like this!
Next choose a different ribbon for the ends. I consulted my ribbon box and settled for pink fluffy trim.
I tied a piece on at each end. The necklace can be worn just by tying it around your neck or if you use a normal ribbon, you should be able to attach necklace findings at either end so that you can take it on and off more easily. 
CRAFT WARNING!!!! This necklace smells absolutely divine!! The candy sweetness lingers for ages, I'm convinced it has afrodisiac properties so don't waste it on children, while it makes for a good kid's party activity, it's a just as fabulous an addition to clubwear!
Fellow biscuit lovers may be interested to know that next month, London is hosting the first ever British Biscuit Festival! It includes a build a biscuit workshop and tea and biscuit social! Yum!
NB: Eat this necklace while it's fresh, OR if you want it to last a little longer, varnish each cookie first (though the downside is that varnish will probably mask the scent!)
Thank you to the lovely Simon Mole who inspired this project!