Welcome to the Ex-Official Blog of Writer, Presenter & Crafts Expert Momtaz Begum-Hossain which stopped being active on 31st August 2016.

For more regular updates follow Momtaz on Twitter: @TheCraftCafe Instagram: @The_CraftCafe Vine: @TheCraftCafe Periscope: @TheCraftCafe Snapchat: Momtazbh

For workshop bookings, writing commissions, presenting jobs, craft project designs, or any kind of enquiry email contact@momtazbh.co.uk

Momtaz's NEW BLOG is www.craftandtravel.com


Showing posts with label necklace. Show all posts

Friday, 4 May 2012

Move over cupcakes: The humble biscuit is back!

Does anyone else remember the TV advert London Needs Biscuits? It was short-lived but I'm pleased to say it's finally been posted on You Tube! The story goes like this:
London is a cold & miserable place where no one smiles....until Fox's comes along and saves the day with their baked treats. These days the UK is infatuated by cake. I'd never say no to a slice of sponge, but when people think cakes are superior to biscuits I disagree. The biscuit is the tea drinker's best friend after all, you can't dunk a cupcake. Possibly the most sociable of all snacks, is the candy shaded, icing coated Fox's Party Ring. Greater spotted at children's parties, it's a design classic. One that evokes the most happiest of memories. Trouble is, eating one when you're an adult isn't the same. They don't dunk as well as other biccies. I've come to the conclusion that they are best reserved for crafting where their aesthetic beauty can be properly appreciated....and hey, they make for far more attractive beads than the those teeny tiny candy necklaces which worrying are these days sold as thongs & nipple tassels ...
To make a party ring necklace you will need:
  • A pack of party rings (these cost me 50P in Waitrose*, so I suspect they are cheaper in Asda, Iceland etc...?)
  • Scissors
  • Ribbon (assorted)

Inspect your biscuits - eat any broken ones. Regrettably there were no injured ones in my pack...
...but I did discover that they don't seem to match the wrapper which was disappointing.
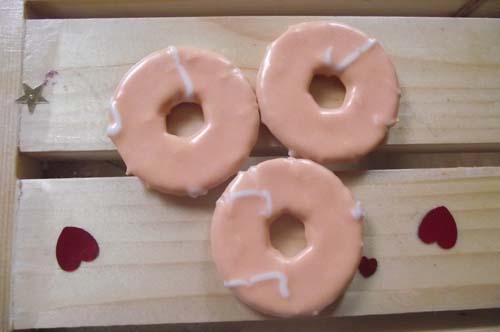
I also I regret to announce that none of the peach ones were selected - what went on with the icing here??!
Arrange an order you're happy with.

Before you start you'll need to cut your ribbon strips cut into 20cm lengths.
Take your first two biccies.
Feed a piece of ribbon through the first two and tie a double knot so it's nice and tight.
Attach the third biscuit in the same way.
When you're done the back will look like this. Trim the ends. Don't worry if it feels delicate it's actually a strong structure and the icing is so solid, it won't chip so you can tie the ribbon as tightly as you want without fearing the cookies will snap.
The front will look like this!
Next choose a different ribbon for the ends. I consulted my ribbon box and settled for pink fluffy trim.
I tied a piece on at each end. The necklace can be worn just by tying it around your neck or if you use a normal ribbon, you should be able to attach necklace findings at either end so that you can take it on and off more easily. 
CRAFT WARNING!!!! This necklace smells absolutely divine!! The candy sweetness lingers for ages, I'm convinced it has afrodisiac properties so don't waste it on children, while it makes for a good kid's party activity, it's a just as fabulous an addition to clubwear!
Fellow biscuit lovers may be interested to know that next month, London is hosting the first ever British Biscuit Festival! It includes a build a biscuit workshop and tea and biscuit social! Yum!
NB: Eat this necklace while it's fresh, OR if you want it to last a little longer, varnish each cookie first (though the downside is that varnish will probably mask the scent!)
Thank you to the lovely Simon Mole who inspired this project!

Thursday, 30 June 2011

My trip to the London Jewellery School

Tutor's samples
Buttons, buttons, buttons...they are one of those extremely useful crafty materials that have so many more uses than just fastening up your clothes. Even displayed in jars they look lovely...infact I'm such a button fan it explains why I have button wallpaper. So when the London Jewellery School invited me to try out one of their classes, the Button Jewellery Taster was my immediate choice. I've seen button jewellery adorn the necks of many fine women and met some who've said they've made their creations themselves, but I've never has a chance to figure out how it was done until now.

The London Jewellery School is just off Hatton Garden the jewellery making hub of London which is filled with endless high end diamond specialists and jewellery stores. The school opened in 2008 and is an independent place to come and learn how to make jewellery. There are over 100 courses to choose from short one off three hour sessions like the one I signed up for to longer day time and evening courses. 
You can also rent kilns and use their studio spaces to make your own jewellery and use their equipment if you havent got any of your own or anywhere to work at home. 
Workshops include making your own wedding rings, children's parties, beading, enameling, silver, metal clay and lots more! There are over 20 professional tutors who lead the sessions so lots of inspiring people to get you motivated about making your own jewellery.
Hmmmmm...buttons!
The button session was run by accessories designer Chu-Mei Ho. We started with a bracelet and the first step was choosing the buttons - the hardest bit ...it was a case of so many buttons, not enough time!
It's best to mix up the sizes
I stuck with layers of two beads but some students opted for three layers, any more than that would be a bit heavy.
Each button was looped through and overalapped for a bracelet
We threaded a piece of DMC memory thread through the back of each button, which measured double the length of the design. My fellow classmates were impressed with my ability to create a composition that went so well with my outfit!
Arranging my necklace
Once we'd threaded it through, we tied the thread at the back of the last bead, trimmed the ends ad closed them with folding crimps before attaching a jump ring and clasp at each end. We then had free range to make a second item and I opted for a button necklace because I've spent ages trying to find a summer statement piece to no avail.
Class in progress
All around the table everyone was engrossed. One participant came along to learn how to make a button bracelet so she could use it as an activity for her daughter's 8th birthday. It's actually very straight forward for kids, the only tricky bit is attaching the fastenings.
Yippee! New jewellery
 I am soooooooo proud of my work! I love my necklace and bracelet set, they surpassed all my expectations - especially the necklace. I've been searching for a summer necklace for months and here it finally is!
When can I come back?


It's just so satisfying having nothing, sitting down, making something and all of a sudden owning something new. I am soooooooo proud of my work! I love my necklace and bracelet set, they surpassed all my expectations - especially the necklace - I aim to wear it all season!

The course costs £35 which for an evening activity is excellent considering you get to keep what you made, you go away with new skills and can fit sessions in around to suit your lifestyle. I've always found with longer courses I end up missing one or two classes because life gets in the way but with lots of one off courses you know you'll get results. I was also really impressed with the facilities, very handy shop and the fact you can book the spaces for your own projects - great idea and brilliant concept. A definite recommendation. Also taster sessions are a great activity to do if you're catching up with a friend or just want to do something on your own.