Welcome to the Ex-Official Blog of Writer, Presenter & Crafts Expert Momtaz Begum-Hossain which stopped being active on 31st August 2016.

For more regular updates follow Momtaz on Twitter: @TheCraftCafe Instagram: @The_CraftCafe Vine: @TheCraftCafe Periscope: @TheCraftCafe Snapchat: Momtazbh

For workshop bookings, writing commissions, presenting jobs, craft project designs, or any kind of enquiry email contact@momtazbh.co.uk

Momtaz's NEW BLOG is www.craftandtravel.com


Showing posts with label make. Show all posts

Tuesday, 4 June 2013

Quick crafting: Ladybird Shoes

Everyone should own a pair of red shoes. 
I got my first pair when I was a baby. 
When I was seven, I slipped over in a pair and ended up in hospital, and missing weeks off school. My last pair were worn to death until every last bit of the sole had withered away. Sad times - they were very comfortable.
So I recently bought a new pair..only thing was they were a bit too ordinary looking, so I grabbed a black permanent marker pen and drew spots all over them.
I wasn't keen on the bows so I snipped them off, they were easy enough to remove, just held on by a few stitches.
Of course I couldn't leave them like that and they were obviously screaming out ladybird!
I made some from craft foam and glued them to the fronts. (Each piece is double-backed to make them strong).
 Then I wore them to the park.

All in all it took around 10 minutes and they make me feel happy.


Tuesday, 8 January 2013

David Bowie Ziggi Stardust Earrings

What with all the love going around for David Bowie today, new song, new album...oh and his birthday, I had to draw your attention to the fact there are instructions for how to make your own Ziggi Stardust earrings in my book. 
You can just about see the glittery lightening bolt across his face! Amazing eh?
The project is designed by Ruth Crean who runs a fantastic website and company called Nice Day Designs, which is where I first came across her work.
I know what you're thinking, but how can you own this fine pair of jewels?
Well you're going to have to buy '101Things To Do With Glitter' turn to page 60 and follow the instructions! Enjoy xxx

Friday, 4 May 2012

Move over cupcakes: The humble biscuit is back!

Does anyone else remember the TV advert London Needs Biscuits? It was short-lived but I'm pleased to say it's finally been posted on You Tube! The story goes like this:
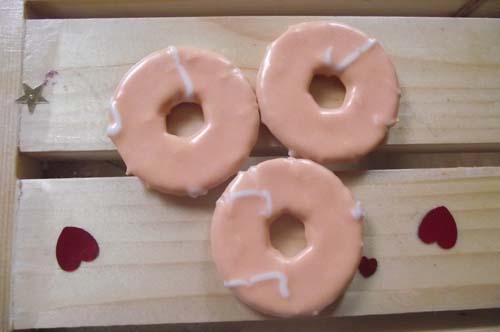
London is a cold & miserable place where no one smiles....until Fox's comes along and saves the day with their baked treats. These days the UK is infatuated by cake. I'd never say no to a slice of sponge, but when people think cakes are superior to biscuits I disagree. The biscuit is the tea drinker's best friend after all, you can't dunk a cupcake. Possibly the most sociable of all snacks, is the candy shaded, icing coated Fox's Party Ring. Greater spotted at children's parties, it's a design classic. One that evokes the most happiest of memories. Trouble is, eating one when you're an adult isn't the same. They don't dunk as well as other biccies. I've come to the conclusion that they are best reserved for crafting where their aesthetic beauty can be properly appreciated....and hey, they make for far more attractive beads than the those teeny tiny candy necklaces which worrying are these days sold as thongs & nipple tassels ...
To make a party ring necklace you will need:
  • A pack of party rings (these cost me 50P in Waitrose*, so I suspect they are cheaper in Asda, Iceland etc...?)
  • Scissors
  • Ribbon (assorted)

Inspect your biscuits - eat any broken ones. Regrettably there were no injured ones in my pack...
...but I did discover that they don't seem to match the wrapper which was disappointing.
I also I regret to announce that none of the peach ones were selected - what went on with the icing here??!
Arrange an order you're happy with.

Before you start you'll need to cut your ribbon strips cut into 20cm lengths.
Take your first two biccies.
Feed a piece of ribbon through the first two and tie a double knot so it's nice and tight.
Attach the third biscuit in the same way.
When you're done the back will look like this. Trim the ends. Don't worry if it feels delicate it's actually a strong structure and the icing is so solid, it won't chip so you can tie the ribbon as tightly as you want without fearing the cookies will snap.
The front will look like this!
Next choose a different ribbon for the ends. I consulted my ribbon box and settled for pink fluffy trim.
I tied a piece on at each end. The necklace can be worn just by tying it around your neck or if you use a normal ribbon, you should be able to attach necklace findings at either end so that you can take it on and off more easily. 
CRAFT WARNING!!!! This necklace smells absolutely divine!! The candy sweetness lingers for ages, I'm convinced it has afrodisiac properties so don't waste it on children, while it makes for a good kid's party activity, it's a just as fabulous an addition to clubwear!
Fellow biscuit lovers may be interested to know that next month, London is hosting the first ever British Biscuit Festival! It includes a build a biscuit workshop and tea and biscuit social! Yum!
NB: Eat this necklace while it's fresh, OR if you want it to last a little longer, varnish each cookie first (though the downside is that varnish will probably mask the scent!)
Thank you to the lovely Simon Mole who inspired this project!

Friday, 20 April 2012

How to get a new skirt: the cheat's way!

It was love at first sight the I moment I spied this gorgeous floral print cotton fabric in my local haberdashery Roll & Rems. I knew it had to be worn to be celebrated properly, but at the moment I don't have time to make new clothes from scratch. Customising on the other hand is the perfect alternative...
I found a black mini skirt lurking at the back of my wardrobe. I had originally purchased it in a charity shop but have never worn it. I rarely wear black, but I bought it as it was cheap and just incase I ever need a black skirt...(yes that old chestnut!)
I laid the skirt on to the fabric, unzipped the back and tucked the edge over the top hems.
Once this was pinned in place, I folded the fabric in at each side and lined the edges up at either side of the zip so that they would't get caught allowing the zip to still work. 
TOP TIP: Don't pull the fabric across the back too tightly, otherwise you may prevent some of the natural movement of the garment, making it a tighter fit. It's worth trying it on at this stage to check.
I also trimmed off the excess that I didn't need.
Finally, I stitched the fabric in place on my sewing machine. Firstly across the top hem, removing the pins as I went. Then one side of the zip, and then the second, overlapping where both sides met at the bottom, under the zip, so that there was complete coverage  and no black skirt peeping through.


Voila! A completely new skirt in less than 30 minutes. So now I have a gorgeous floral skirt and I still have lots of lovely fabric left...question is, what do I do with the rest of it? Hmmmmm...

Saturday, 7 April 2012

Wanted! Contributors for a new Craft book

This Autumn sees the launch of my new book (pictured above) and I'm really excited to be starting on my next publication, scheduled for release Autumn 2013 now! It's a follow up to the forthcoming 'Glitter' book published by Vivays Publishing, but this time it will be '101+ Things to do with' a different material.
There are four categories inside the book:
  • Fashion & Accessories
  • Home & Interiors
  • Cards & Papercrafts
  • Food & Gifts 
And once again I'm on the hunt for exciting, unusual, original crafts projects designed by craft makers & designers from all over the world to feature in it.

If you are interested in finding out more, or would like to submit an idea that falls into one of the above categories, please email me at glittercrafts@ymail.com. You'll then be asked to submit a proposal describing what you would make for the book. If selected, you will need to make that project, and then send it to me, along with instructions for how you made it.
 
Proposals must reach me by April 30th however before submission you'll need to know what 'special' material your project should include, so email me first and I’ll let you know what it is...

I look forward to hearing from you!

Momtaz x


Sunday, 5 February 2012

Snow in London! My snow hedgehog!

This morning I went to pay my respects to my late pet hedgehog Miss P in East Greenwich Pleasaunce, a small community park, and decided to make her a gift...some company for the day in the form of a snow hedghog. It's located just opposite where she is buried.
Close Up

Twig plaque

Snow in the Pleasaunce
Miss u Miss P!

Saturday, 28 January 2012

Top secret photos from my forthcoming book!

I'm so excited I may burst! The only way I can prevent this from happening is if I share some sneaky, top secret photos from my forthcoming book '101+ Things to do with Glitter', published by Vivays Publishing this Autumn - the photoshoots started yesterday! 
It's a bright & sparkling craft book which contains 200 suggestions for what you can do with the shimmery stuff including papercrafts, food, toiletries,gifts, interiors and of course some glistening ideas for your wardrobe. I took some photos of yesterdays fashion shoot in order to share them on my blog nearer the time of publication but I just couldn't wait!
We took photos around Islington in North London and also stopped by Teletubbies land.
It was the only place we could find a yellow brick road for the fairytale project.*
(Roger from Struktur who is the book's art director & designer has contacts with munchkins.) My amazing model Nadia Kamil (an actress. writer, comedian and now craft star) was freezing but was prepared to lie on a damp floor to get the shot.
I think that's about all I can reveal. Watch this space and my twitter account for more sparkly updates over the coming months about the most glittering book you will have ever seen!

*(I'm sure you know which fairytale I mean....but ssshhhh for now!) 

Saturday, 10 December 2011

How to make & customise: super simple stockings


Stocking fillers are the best Christmas gifts. I’d be happy is Santa delivered me something cheap & cheerful from Poundland...as long as it’s not coal (but I’m not a naughty girl so I don’t need to worry!)
Of course Santa gives the best prezzies to the people with the best stockings. I recently designed stockings for Dog’s Monthly magazine (for the pet and the owner!), pictured above. And below are a selection of handmade stockings to inspire you, made by staff from the V& A Museum. I ran a special Christmas craft workshop for them for their recent away day.


  The plan was for staff to hang them in their work corridor for everyone to admire.

  I gathered lots of spangly materials and let them loose on my supplies.

They beavered away for 1.5 hours. All 25 of them!


To make your own super simple stocking, simply draw two basic stocking shapes on a piece of felt (these ones were just less than A4 in size), and cut them out.

Then pick your embellishments and get crafting! Sew, glue, paint, draw, glitter, bead, sequin, embroider or write…whatever takes your fancy!
 

To join it together use a basic in and out running stitch all along the sides.
 
Or a whip stitch which is a diagonal stitch that goes along the sides holding the pieces together.

Finally stitch a piece of ribbon in a loop in the inside corner, to hang up your stocking.

Santa if you’re reading this, here’s what I would like in my stocking this year, (just incase the stock in Poundland is sold out and your elves can swing by somewhere posh):

  1. Chocolate from Hotel Chocolat (any as long as it’s not dark!)
  2. Lip Gelee lipgloss from MAC (they’ve stopped selling it, but you’re Santa, you can make it come back!)
  3. A jar of Chilli Marmite….I’ve got friends who have tried it but I’ve not seen it yet : (
  4. A voucher for TK Maxx (no explanation needed)
  5. A date with John Abraham….well he’s split up with Bipasha, surely you can pull some strings? ...for me??????

Oh and clementines are ok as long as they are sweet! Thanks : )