Welcome to the Ex-Official Blog of Writer, Presenter & Crafts Expert Momtaz Begum-Hossain which stopped being active on 31st August 2016.

For more regular updates follow Momtaz on Twitter: @TheCraftCafe Instagram: @The_CraftCafe Vine: @TheCraftCafe Periscope: @TheCraftCafe Snapchat: Momtazbh

For workshop bookings, writing commissions, presenting jobs, craft project designs, or any kind of enquiry email contact@momtazbh.co.uk

Momtaz's NEW BLOG is www.craftandtravel.com


Showing posts with label how to make. Show all posts

Sunday, 6 March 2016

How to make Bollywood Chocolate Easter Eggs


You've heard of Boiled Eggs...well these are Bollied Eggs: chocolate Easter eggs with a Bollywood theme. Completely edible, I made them by sticking edible picture onto chocolate eggs, then decorated them with edible glitter, edible gemstones, edible flowers, edible glue and even edible paint which I got from my local craft store Hobbycraft.

How to make your own Bollywood Easter eggs


Materials you'll need to make Bollywood chocolate eggs

First up, choose which stars you want to immortalise in chocolate and save the images as jpg files. I emailed my images to a UK based company called Icing Pictures. You send them the images you want printed, they print them onto edible icing and post them back to you. It's a really easy service, they even re-size the images for you. I had six images printed onto one sheet of A4 and it cost £9.99 including postage and packaging. I'm guessing this service exists in other countries - even your local bakery might be able to help. 
Edible images, cut out 
Next up decide on your eggs. The easiest method is to buy ready made eggs, or if you're feeling adventurous you can melt chocolate, pour into a mould and make your own eggs. I tried this method and discovered that a) you need to use a lot of chocolate as when you melt down a bar, you're not left with much and b) I couldn't get the eggs to come out of the moulds easily. If you're already a chocolate maker you may know the knack, but after ending up with broken shells I decided to stick with the easy option and buy the eggs.


Chocolate egg-making fail

Apply the image to the egg. Instructions for the brand of edible picture you use may vary, but the type I bought involved cutting it down to size... 


peeling off the backing and wetting the back with a little water...


...then smoothing it onto the chocolate shell. It's a delicate operation so be patient. Too much water and the image will disintegrate and too much smoothing and it will erode off, so practise a few times before you go through with any final designs.


Once the image is on, the fun part begins: the decorating. 
Here are some ideas.

The Item Girl egg


Bollywood movies wouldn't be the same without a song and a dance. The most innovative and best-loved Item Girl in history is Helen, a cabaret star who starred in numerous movies in the 60s and 70s. She was one of a kind, with great style, so I created an elaborate, colourful, vintage inspired egg embellished with sugar flowers.

The Bejewelled Devdas egg

When it was released in 2002 Devdas starring former Miss World Aishwarya Rai-Bachchan was the most expensive film made in Bollywood history, costing over $7million. Lavish in every way, from the extraordinary costumes to the grand, colourful sets, I painted this egg in edible gold/copper paint then stuck on edible jelly jewels held in place with icing pens. I also outlined the image with icing spots.


The Simple Salu egg

Affectionately known as Salu, Salman Khan is my favourite of all the Khans in the filmi fraternity. He has incredible charisma on the screen and I always look forward to his films for their entertainment value. I kept this one simple with a touch of icing - I was going to apply silver balls but decided they just weren't needed in the end. He alone holds the attention. 

The Randeepian egg


I'm a Randeepian and proud - a dedicated follower and fan of actor Randeep Hooda, one of the most popular actors of the moment and undoubtedly the hottest, hence the reason I positioned him inside an iced heart and added white chocolate hearts which I decorated with edible glitter and icing - one I can't wait to take a bite into!


The Blockbuster egg

Dilwale Dulhania Le Jayenge is the most famous Bollywood movie in history and one of the best. Released in 2015, 20 years on it's still playing in cinemas - no other film can claim that. The leads are played by mega stars Shah Rukh Khan and Kajol, and this is a classic film poster shot. 


Not a Bollywood fan? You can get any image printed onto edible paper from pop stars to pets. 


Top tips

  • The icing pens take around 24 hours to dry so make them in plenty of time before you need to give one as a gift.
  • While decorating the egg, sit it in an egg cup as that way you can access all sides of it easily.
  • If you are giving them as a gift try placing them in cellophane and tie up with ribbon.

Materials

My images were printed at www.icingpictures.co.uk.

All other materials used for this project were from my local branch of Hobbycraft:
Sugar flowers, edible glitter, icing tubes, edible paint, chocolate hearts, edible gemstones.

The chocolate eggs and giant green and yellow iced spots on the DDLJ eggs were from Asda, but you'll find all of the above online or in cake supplies shops. 


Happy Bollied Egg Making!


Friday, 23 January 2015

How I Made A Velvet Cape/Shrug Type Thing

Some fabrics are so beautiful it's really difficult deciding what to do with them. Then it's really painful when it comes to cutting them up. This pink devore encrusted with crystals is one such fabric. I've had it a while (originally picked up from Khushboo Textiles in Birmingham) but just couldn't make my mind up about what to do with it.
I toyed with using it as an interiors fabric or in my wardrobe. In the end I decided it had to be worn - but at the same time I thought it would be wasted on a specific garment like a top or skirt so I turned it into an article than be worn with different things while remaining the focal point.
So I made it into a shrug/cape type thing, short at the top to show off the jewels...
and long at the back because the fabric drapes so well.
The cape required minimal construction, but as the fabric is transparent and soft it needed a lining.
I started by folding fabric around a mannequin and then pinned it where I liked the shape and this translated into the fabric I cut out as a template to make the lining.

I then joined the lining to the fabric and folded over the top to create a pocket, but only stitched the edges 
together. This created the arm holes.
It's still a bit of a work in progress. The shrug can currently be worn but also I could still emphasise the folds and draping more or even fasten it at the front. It's incredibly regal and reminds of the kind of gown a fairytale king might enjoy wearing! 
It also a bit strange and actually I think the crystals are upside down to what they are meant to be but I like the fact it's unique and there is nothing like it in the whole world!


Sunday, 14 April 2013

Girls' Night In Book Launch Party at Hannah's house

Hannah Read-Baldrey is so beautiful in real life I couldn't believe I was in the same room as her, let along her house! She looks amazing in her previous books Everything Oz and Everything Alice, but real life? She lit up the place with her vibrant aura and confidence making me and the other guests feel very welcome at the launch party of her new book Girls' Night In. (GNI)

GNI is filled with 'Crafts, Cakes and Cocktails for The Ultimate Party' and to celebrate it, that's exactly what Hannah did. She invited all sorts of amazing women to attend her do including friends, family, bloggers and crafters; treating us all to a very special evening.
On the menu were these two scrumptious cakes...
...and on the guestlist, lots of girls to enjoy them, including Zoe from Craft Candy and colleagues from Hannah's publishers Quadrille. Behind them is the actual art work of the book cover which Hannah collaged from paper.
Decorations included Leggy Bunting, as featured in the book.
And flavoured popcorn: the perfect snack to accompany girlie movie nights.
Cakes were dotted throughout the house. In whichever room you were in, you were never far from a sponge!
My kind of party is one with activities - and despite being the host, Hannah made time to run workshops during the night including showing us how to give each other a flower manicure which she demonstrated.
I had mine done in a rather lovely light blue by a girl who thankfully was very understanding that the nails I did for her in return didn't quite turn into flowers...
...but stars instead. I've never had a problem painting my own nails but painting someone else's is such a different experience, very nerve racking as it requires so much concentration.
Here are my finished nails along with the page in the book from which they were inspired.
Two more designs from the night - I really love the Art Deco coloured French tips on the left.
Pampering is an important part of a girlie get together, but there isn't just ideas for nail decor in the GNI book; you can also try out a recipe for your own face mask.
And get make-up application tips.
There are also party games which are great for breaking the ice. Hannah mentions in the book that GNIs don't just need to be for groups of friends who know eachother, but are an ideal way to make new acquaintances.
Craft activities to keep you occupied are aplenty in the book including knicker-making, hair fascinators, a clutch bag and fabric dolls, but my favourite project is these gorgeous bejewelled tights. I swear by tights and I love bling, plus they are really easy to do so have my name written all over them!
This is one of those photos that really doesn't do the subject any justice as you can't tell the proportions but this is the biggest slice of brie to have ever been baked! 
Or at least it seemed that way! It was gigantic - about the average size of a chair seat. Warm and googey inside it was drizzled with honey and caramlised nuts and was the edible talking point of the evening.
My favourite however was this. I'm not normally a fan of quiche but this flan was so scrumptious I had two slices. The pastry and base were delicious.
And to think the sweet stuff was just as incredible as the savoury dishes! 
Fresh cream filled, soft choux buns...these profiteroles were so heavenly...
All manor of cocktail recipes feature in the book too so at the party there was a whole cocktail tent, filled with drinks so you could make your own tipple, enter the cocktail making competition or create fish bowls to share.
Oh and those cakes I showed at the beginning? I got to taste them both and they were yummazing!
The front cake was peach and cream flavour  - it had several layers, all that were perfectly moist, then your taste buds were treated to surprise mouthfuls of peach which added a fruitiness that balanced out the sweetness of the perfectly piped pink icing.

There's a great line in the press release for the GNI book that says 'in these cash-strapped times, this book offers ideas for the perfect alternative to costly bars and restaurants.' 

I really like this sentiment, that instead of going out, you can stay in and still have fun. Obviously you do need to spend a few pounds to supply food, drink etc but there's always  cheap alternatives and you can ask everyone to contribute or bring donations to share the cost.

I'm not sure if I'll be hosting any GNIs of my own too soon. I'm not the most active of hosts, in fact it's been over two years since I've cooked for anyone at my flat let alone had more than one person over. 'Hosting' and having to tidy up for people freaks me out but I will definately incorporate lots of Hannah's ideas: perhaps I can persuade a friend to host a party around theirs instead and I can help with the planning!

Girls' Night In 
Craft, cakes and cocktails for the ultimate party
by Hannah Read-Baldrey is published by Quadrille Publishing (£16.99) and is available now!
You should also check out the accompanying website.


Tuesday, 8 January 2013

David Bowie Ziggi Stardust Earrings

What with all the love going around for David Bowie today, new song, new album...oh and his birthday, I had to draw your attention to the fact there are instructions for how to make your own Ziggi Stardust earrings in my book. 
You can just about see the glittery lightening bolt across his face! Amazing eh?
The project is designed by Ruth Crean who runs a fantastic website and company called Nice Day Designs, which is where I first came across her work.
I know what you're thinking, but how can you own this fine pair of jewels?
Well you're going to have to buy '101Things To Do With Glitter' turn to page 60 and follow the instructions! Enjoy xxx

Friday, 4 May 2012

Move over cupcakes: The humble biscuit is back!

Does anyone else remember the TV advert London Needs Biscuits? It was short-lived but I'm pleased to say it's finally been posted on You Tube! The story goes like this:
London is a cold & miserable place where no one smiles....until Fox's comes along and saves the day with their baked treats. These days the UK is infatuated by cake. I'd never say no to a slice of sponge, but when people think cakes are superior to biscuits I disagree. The biscuit is the tea drinker's best friend after all, you can't dunk a cupcake. Possibly the most sociable of all snacks, is the candy shaded, icing coated Fox's Party Ring. Greater spotted at children's parties, it's a design classic. One that evokes the most happiest of memories. Trouble is, eating one when you're an adult isn't the same. They don't dunk as well as other biccies. I've come to the conclusion that they are best reserved for crafting where their aesthetic beauty can be properly appreciated....and hey, they make for far more attractive beads than the those teeny tiny candy necklaces which worrying are these days sold as thongs & nipple tassels ...
To make a party ring necklace you will need:
  • A pack of party rings (these cost me 50P in Waitrose*, so I suspect they are cheaper in Asda, Iceland etc...?)
  • Scissors
  • Ribbon (assorted)

Inspect your biscuits - eat any broken ones. Regrettably there were no injured ones in my pack...
...but I did discover that they don't seem to match the wrapper which was disappointing.
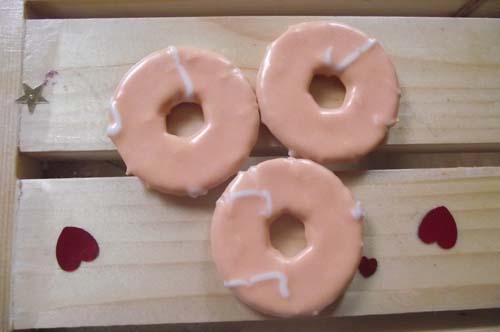
I also I regret to announce that none of the peach ones were selected - what went on with the icing here??!
Arrange an order you're happy with.

Before you start you'll need to cut your ribbon strips cut into 20cm lengths.
Take your first two biccies.
Feed a piece of ribbon through the first two and tie a double knot so it's nice and tight.
Attach the third biscuit in the same way.
When you're done the back will look like this. Trim the ends. Don't worry if it feels delicate it's actually a strong structure and the icing is so solid, it won't chip so you can tie the ribbon as tightly as you want without fearing the cookies will snap.
The front will look like this!
Next choose a different ribbon for the ends. I consulted my ribbon box and settled for pink fluffy trim.
I tied a piece on at each end. The necklace can be worn just by tying it around your neck or if you use a normal ribbon, you should be able to attach necklace findings at either end so that you can take it on and off more easily. 
CRAFT WARNING!!!! This necklace smells absolutely divine!! The candy sweetness lingers for ages, I'm convinced it has afrodisiac properties so don't waste it on children, while it makes for a good kid's party activity, it's a just as fabulous an addition to clubwear!
Fellow biscuit lovers may be interested to know that next month, London is hosting the first ever British Biscuit Festival! It includes a build a biscuit workshop and tea and biscuit social! Yum!
NB: Eat this necklace while it's fresh, OR if you want it to last a little longer, varnish each cookie first (though the downside is that varnish will probably mask the scent!)
Thank you to the lovely Simon Mole who inspired this project!