Welcome to the Ex-Official Blog of Writer, Presenter & Crafts Expert Momtaz Begum-Hossain which stopped being active on 31st August 2016.

For more regular updates follow Momtaz on Twitter: @TheCraftCafe Instagram: @The_CraftCafe Vine: @TheCraftCafe Periscope: @TheCraftCafe Snapchat: Momtazbh

For workshop bookings, writing commissions, presenting jobs, craft project designs, or any kind of enquiry email contact@momtazbh.co.uk

Momtaz's NEW BLOG is www.craftandtravel.com


Showing posts with label earrings. Show all posts

Tuesday, 8 January 2013

David Bowie Ziggi Stardust Earrings

What with all the love going around for David Bowie today, new song, new album...oh and his birthday, I had to draw your attention to the fact there are instructions for how to make your own Ziggi Stardust earrings in my book. 
You can just about see the glittery lightening bolt across his face! Amazing eh?
The project is designed by Ruth Crean who runs a fantastic website and company called Nice Day Designs, which is where I first came across her work.
I know what you're thinking, but how can you own this fine pair of jewels?
Well you're going to have to buy '101Things To Do With Glitter' turn to page 60 and follow the instructions! Enjoy xxx

Tuesday, 24 January 2012

Tutorial: How to Make Paper Earrings for Chinese New Year

As it’s Chinese New year this week I decided to make a Chinese inspired craft
but there’s no typical dragons or lanterns here – just paper. The art and craft of papercutting is associated with many cultures, Chinese being one of them. Luckily you don’t need to be as patient as Rob Ryan to make one. Papercutting in China is known as Jianzhi and they consist of intricate patterns, often symmetrical, used to decorate interiors. My tutorial is a cheats, easy way to get started on this fine craft. 
There are two ways to do a papercut; with scissors or using a craft knife. It depends on the complexity of the design. A papercut can either be the outline left behind from the shapes you cut out, or the shapes themselves. These earrings could have been made by scissors but using a craft knife means you get to keep the outline too, as you’ll soon find out… 

First all you need to get your materials together. To make paper earrings you need: 
  • Scrap paper – any type is suitable. For professional papercutting  a coated paper is normally used but for this project, anything goes!
  • Glue stick
  • Scissors
  • Craft knife and mat
  • Marker pen
  • Round sequin
  • Earring finding
  • Inspiration


For my design, I was reading a magnificent book about hedgehogs at the time so decided to make hedgehog earrings. I started by drawing hedgehog silhouette on the back of my chosen paper and then cut them out using a craft knife. The trick to using a craft knife is keeping it flat, not at a point. And always place a cutting mat underneath to protect the surface.
I then used scissors I cut out spikes from various mixed papers and glued them on using the glue stick– adjust the design according to the animal or object you make. You can use marker pens to draw on features.


To turn them into earrings, make a small hole using a pin at the top. Then the important part. Glue a sequin over the back of the hole to prevent it from tearing, otherwise as soon as you add the earring finding, it will tear through. Leave to dry before adding the earring hook. 

 
Before wearing them paint the front side with a layer of PVA glue to secure the design and give it a gloss.

I used the outline to make a matching bookmark.

Paper crafting and jewellery making couldn’t be more easy - give it ago, you probably have the materials at home already to get started!

Monday, 19 July 2010

10p earrings in less than 10 minutes

Kit box
You will need: Two earring findings, two head pins (the long metal sticks), round nosed pliers, wire cutters (not shown!) and a selection of beads.


Introducing the trusty headpins
Head pins are long metal sticks with a circular bottom, which acts like a knot so that your beads don't fall off the end. They easily get bent because they are so thin, start by smoothing or straightening them out as much as possible by easing the round nosed pliers up and down each one. Otherwise you may end up with wonky earrings!

Make them as long as you want!
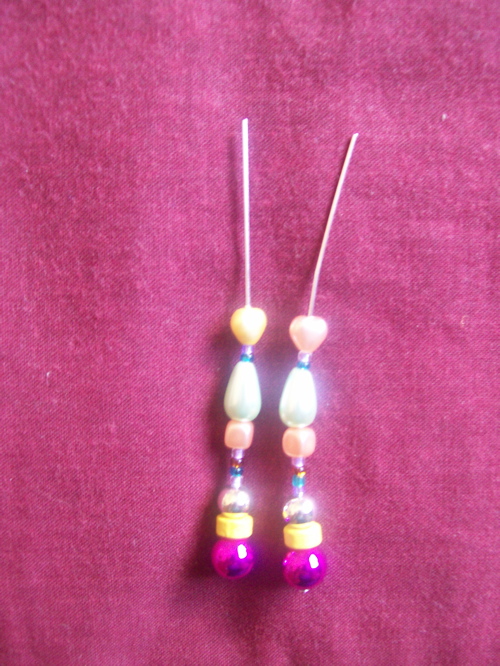
Now for the fun bit, thread any combination of beads onto the headpin and repeat on two pins so you have an identical pair. Make them as long or as short as you like, just leave 1cm free at the top - you may need to trim the pin using wire cutters according to the length you want.

Get bending!
 This is the most tricky bit but it just takes getting used to, after you've done it once, you will have mastered it! Using the pliers, bend the 1cm end around to create a loop. Hook the earring finding onto the end of the loop and then close the loop by pressing it inwards together with the pliers.

Voila!

That's it, all done - your new earrings are ready to wear!!
They take less than 10 mins to make (the only slow bit is making sure your loops are rounded evenly but as it's wire it can be bent and unbent as many times as you wish so just keep practising!)

Cost 10p per set......the beads probably don't come to more than 2p, depending on what you use (I used seed beads and faux pearls bought in bulk), the headpins cost 2p each, findings 2p each.
All materials purchased from www.creativebeadcraft.co.uk.

With a crafty project this quick, easy and cheap, you can make a new pair for every hour of the day!