Welcome to the Ex-Official Blog of Writer, Presenter & Crafts Expert Momtaz Begum-Hossain which stopped being active on 31st August 2016.

For more regular updates follow Momtaz on Twitter: @TheCraftCafe Instagram: @The_CraftCafe Vine: @TheCraftCafe Periscope: @TheCraftCafe Snapchat: Momtazbh

For workshop bookings, writing commissions, presenting jobs, craft project designs, or any kind of enquiry email contact@momtazbh.co.uk

Momtaz's NEW BLOG is www.craftandtravel.com


Showing posts with label do. Show all posts

Monday, 18 July 2011

Something Smells Good!

I've been wanting to get along and visit Homemade London for a while and I finally popped along last week. It's a little crafty heaven which runs creative workshops and private craft parties. Yes there's a few of these places in Londinium these days but believe me, they vary in quality (some seem to think they 'started it' while everyone else copied them)...well my view is anyone who thinks like that is not a true creative. 
The fact is if you like making things you should respect that skill sharing and accessibility is all part of the enjoyment. I believe there is plenty of room for crafty workshop venues, there should be one in every town of the UK, just like there (used to be) public libraries (but hey that's another story.) They'll always be a place for colleges and longer creative courses but short workshops, sewing cafes, ceramic cafes etc allow you acquire new skills and get inspired when you can fit it into your life. Yes you have to be prepared to invest, (average workshop prices at most places cost around £35) but they are small businesses that need investment like anything else. So although you may not be able to afford to go all the time, you can be sure that when you do, you'll get something special out of it. OK RANT OVER....back to my lovely trip.
The crafty heaven is based in a pretty village street
Believe it or not, Homemade London is just a couple of minutes walk from one of the busiest spots in London (the flagship Primark in Marble Arch) it's located in a quiet, picturesque street in an area called Portman Village (which I had never heard of until I got here...this is why I love London, it is continously full of surprises even for lifelong dwellers of the Capital like myself).
Nicola Barron, owner of Homemade London
It's the brainchild of Nicola Barron, who used to work in TV and is a self-confessed interiors and fashion junkie. She opened the 'store' less than a year ago. (Birthday coming up next month.) So it's no wonder the inside is so pretty.
Ooh, how I wish I had a making table this big!
It's fresh, light and airey though still has a sense of 'early days'. There's a downstairs and upstairs section and if you hold a private party here you can use both areas.
Getting crafty is just the start
Workshops can be designed to suit your preferences, or you can book on one of their  sessions which include bag making, handstitched notebooks, lampshade decor, wedding crafting and even lingerie.
I made my own bottle of 'Begum Blend'
I attended their newest session 'Perfume Making AND Afternoon Tea'....talk about blissful afternoon! The session runs on Tuesday and Thursday afternoons and with just four pupils in each class, yummy cakes from local bakery Cocomaya and 1-2-1 attention from Nicola herself it's a truly pampering way to while away a couple of hours (not forgetting you get to take home a scent that's all yours.)
It's all in the blend
Having no prior knowledge of working with scent I presumed it would be a fairly straight forward task, after all most people know what they like and what they don't yet I discovered within minutes that perfume blending is in fact a complete art form. I had no idea that smells and mood can change so quickly with just one drop of fragrance.


We started by having a sniff of top, middle and base notes to see what took our fancy. A huge fan of vanilla like cocoa smells, I was most drawn to Benzoin, Cedarwood, Black Pepper and Rose (the turkish delight variety) and decided I'm not keen on citrus (too many associations with all the lemon scented cleaning products I have at home.)
Farah made a fruity blend
Farah my workshop companion interestingly chose the opposite scents to me, light fruity, summer ones - her blend although not to my taste, smelt very tempting and 'professional.'
This tea set looks even more amazing in real life!
Incidently the Afternoon Tea element of the session was a nice touch though it is a little hard to enjoy yummy cakes that look like dinky chocolates when your nose is so infused with the whiff of excitement. But anyone thinking of going for an afternoon tea I recommend instead of going to a regular hotel, combine the tea and chat with doing something crafty - it's the best of both worlds so you'll leave feeling doubly as happy. A brilliant session for friends, a unique way to spend a day off work, or if you're in London on holiday and fancy seeing a different side of British life, a slice of homecrafing couldn't be more cultured.


All images from Homemade London apart from the ones taken at my workshop (it's not hard to tell the quality apart!)

Monday, 4 July 2011

Alice Crafts

Everything Alice: the Wonderland Book of Makes
The only summer crafting guide you need!
I'm a sucker for anything themed...especially a party! Yesterday I was working out  the number of themed parties I've held over the past few years....a jungle fiesta, under the sea, village fete, winter wonderland.....disappearing into another land and pretending to be someone else is one of the most fun things you can do. We do it all the time in our imaginations - as children we speak about these experiences more yet as adults we keep these fantasies to ourselves.
But the child in us, no  matter how much we suppress it manages to pop out whenever we see something that puts a smile on our faces. And that's why Everything Alice is a craft book that from just one mere flick through will make you happy. It's a remedy to every day stress allowing you to dip into a secret place where anything is possible.

'Alice' of course needs no introduction....she is Alice in Wonderland. Lewis Carroll's remarkable story about a little girl and her amazing adventures involving a secretive white rabbit, a smiling cheshire cat, teeny tiny doors and tempting tasty morsels. In this book (released today) the authors have delved deep into Wonderland and designed 50 projects that celebrate Alice and show you how to capture a piece of her imagination in your home. 
Authors Hannah & Christine
And here they both are, showing off mosaic masquerade masks, one of the projects in the book.

Craft ideas

Craftwise there are some fantastic and original projects that will bring sparkle to your life like a teapot flower pot, giant rose lights and playing card bunting alongside more classic projects that you've seen before like shoe bags, a notice board and tea cosy. (This isn't a bad thing - just an observation. Regardless though they are lovely and useful so no complaints from me!)

Holiday activities

But it's not the craft projects that stand out and make this book different. The truth is these days there are too many fantastic craft books out there.  When I was the editor of a crafts magazine I saw so many craft books on a daily basis I used to tear my hair out because 90% of them were dull and unappealing. Six years on craft books are glorious and most are like coffee table inspiration books that keep you coming back for more.. Another analogy is the fact that craft books these days are very much like craft porn, people just buy them and look at them but don't actually make anything.
What I like about this book most is the short one page ideas and projects that have minimal instructions like fabric covered furniture and the vintage cake stand. I've never liked following instructions so these smaller simpler projects work better for impatient crafters like me who just don't have time to read lots of 'what to do' paragraphs.
There are also activity ideas like making a shadow puppet play (above)....now that's the kind of thing a parent should see and feel inspired to do with their children over the summer holidays.
Yummy ideas
'Pure craft' books seem also to have been replaced by generally 'making' and in this DIY vein, the book also includes scrumptious recipes. Alongside these beautiful red velvet cakes (which look more pinky than the usual recipes) the Duchess Macaroons are my favourite. The ultimate treat, French style macaroons are as stunning to look at as they are tasty. And these ones sound like the yummiest flavour in existence, rosewater with lavender cream I am salivating just imagining them. The truth is I will never make this recipe because I don't have the confidence to make a macaroon; they are too special to go wrong. I would rather once year on my birthday go to Laduree and buy myself one (one because that's pretty much all I can afford). But Alice's macaroon is like a fantasy, one I'll look at from time to time and imagine eating. I have a total lavender obsession when it comes to edible things - lavender tea, lavender shortbread....it just tastes so special! And for the ultimate refreshing 'Drink Me' cordial, there's also a recipe for Lavender lemonade. Yum!
For those not feeling crafty

Just incase you are more of a craft porn hoarder than a maker, the authors Hannah and Christine will soon be launching their own Alice stationary range so you can own something Alice themed without having to make it! (Sounds good to me! For time saving reasons -obviously I shall never stop crafting!)

So, overall, should you get this book? If you own lots of craft books then don't just get this to add to your collection - it will be wasted. Get it because you honestly want to make something different and have someone in mind to make it for...(admit it most crafters never have time to make things for themselves but presents are always a good motivation).

Also get this book if you need to keep children occupied over the summer holidays. It's a very summer friendly book, don't leave them alone to make things themselves; these projects were made for enjoying with groups or friends. You could invite your friends over for an afternoon of Alice themed craft activities (cake and tea compulsory). This is what I would do if my flat was bigger and made for entertaining. Sadly it isn't and I don't have a huge garden like the one in the book but I guess if I use my imagination enough just like Alice there's always the communal concrete courtyard where I hang my clothes out to dry!

Images taken from the Everything Alice website (thanks!)

The book is out now priced £14.99 from Quadrille Publishing. 

Monday, 19 July 2010

10p earrings in less than 10 minutes

Kit box
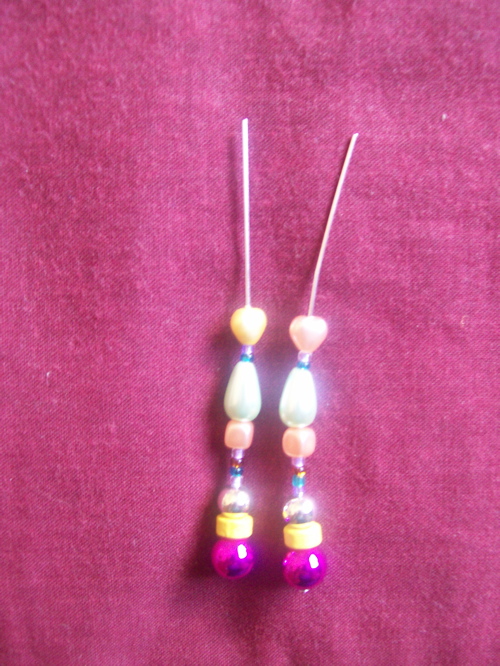
You will need: Two earring findings, two head pins (the long metal sticks), round nosed pliers, wire cutters (not shown!) and a selection of beads.


Introducing the trusty headpins
Head pins are long metal sticks with a circular bottom, which acts like a knot so that your beads don't fall off the end. They easily get bent because they are so thin, start by smoothing or straightening them out as much as possible by easing the round nosed pliers up and down each one. Otherwise you may end up with wonky earrings!

Make them as long as you want!
Now for the fun bit, thread any combination of beads onto the headpin and repeat on two pins so you have an identical pair. Make them as long or as short as you like, just leave 1cm free at the top - you may need to trim the pin using wire cutters according to the length you want.

Get bending!
 This is the most tricky bit but it just takes getting used to, after you've done it once, you will have mastered it! Using the pliers, bend the 1cm end around to create a loop. Hook the earring finding onto the end of the loop and then close the loop by pressing it inwards together with the pliers.

Voila!

That's it, all done - your new earrings are ready to wear!!
They take less than 10 mins to make (the only slow bit is making sure your loops are rounded evenly but as it's wire it can be bent and unbent as many times as you wish so just keep practising!)

Cost 10p per set......the beads probably don't come to more than 2p, depending on what you use (I used seed beads and faux pearls bought in bulk), the headpins cost 2p each, findings 2p each.
All materials purchased from www.creativebeadcraft.co.uk.

With a crafty project this quick, easy and cheap, you can make a new pair for every hour of the day!

Wednesday, 30 June 2010

The Great Apron Swap 2010

 
The brainchild of New Zealand based crafter Sarah 'Red' Gingham, The Great Apron Swap 2010 was inspired by this book which shows you how to sew lovely aprons (I discovered it in the Borders closing down sale as so was pleased to see it getting some recognition.)
A few months ago she challenged bloggers from all over the world to make an apron and swap it with someone else. In total 81 ladies took part (she doesn't mention the men so I'm guessing there were no male entrants!)


The partner I was allocated was Jenny author of crafty blog Oh Joh and who lives in Australia. 


I was super excited when the parcel arrived, it's so fun knowing you've got a new item to own that's all yours: 


After ripping open the envelope I was greeted by a lovely note on a cute Russian Doll postcard and then came the apron.....


Wow, it's so pink, so me!! The motifs are based on an aboriginal design,  the ties are adjustable so it can be worn by anyone. All in all it's fantastic quality and absolutely gorgeous. I am going to wear it for years to come : )


I'm not sure what she thinks of mine yet, something went wrong in the making. It's a Bollywood Apron made of sari offcuts and trims but it shrunk in the sewing process and became child size - luckily she has girls who will hopefully appreciate it!!


Such a brilliant idea, I especially love how the response was international.
Thanks Sarah for a superb blogger project, loved being part of it! 


Sunday, 25 April 2010

Look what the postman delivered!

Yipeeee! For the first time in ages the postman delivered some interesting post !

Exciting post No 1:
Yesterday I received this box from Dylon.


Inside was a stripy tee and box of Colour Catcher:


It's a product that stops your colours running in the wash. Whenever I've lived in shared houses people always seem to do 'light' or 'dark' washes and as the letter I got with the box states, what do you do when you have a spotty dress or stripy top that's both light and dark???? Hmmm...........Well apparently you buy this product which works wonders by trapping loose dyes so that your clothes don't get ruined. Thank you Colour Catcher team for sending me the gift but I won't be using it (though I may wear the free t-shirt!)

You see I think washing lights and darks separatley is a myth, I have never done a separate wash for lights and darks, I bung them altogether and touch wood have never had any problems. Maybe I am just lucky, but with my colourful wardrobe, I should know about washing colourful clothes and I can honestly say, it's fine to mix!

I've never had problems washing my colourful clothes!


Exciting post No 2:

A couple of weeks ago I was invited to take part in an Art Exchange by Jo Cheung- it's a bit like a chain letter where you put your name and address on an email that gets sent around and within a few days you should receive 36 free pieces of artwork. Well, I received just one but it was lovely nonetheless (although it would have been extremely fun to have got more!)
Here it is:


First of all it just seemed liked lots of pretty business cards - these were for my artist Kate Lynch who liked to make cards and things from recycled materials. But then I realised it was actually an amazing stitched decoration, here's what the label said:

Recycled Decorations
Made from a variety of recycled papers and beads - ideal for brightening up any space . Hang, drape or pin up anywhere!

It's very pretty and consists of punched out shapes which have been sewn together but still retains a dangle factor. It is like a strand from a beaded curtain but much more delicate, a whole room of them would look rather spectacular. Kate also has a blog so I can keep track of my new artist friend! Art Exchange was great concept and I would happily do it again as it's a great way to get quirky handmade things for free, or in my case just thing!

Now, where to hang it??


Saturday, 3 April 2010

Bollywood Easter eggs

When it comes to giving Easter gifts it's not just the chocolate that matters, presentation is everything and who needs another cardboard box? Personalising your chocolate eggs is much more impressive - take them out of their original wrappers and decorate them in your own style - my favourite is jazzing them up with the bling factor for a true Bollywood flavour and who better to give them to than my favourite Bollywood Experts Raj & Pablo. This morning I reviewed a new Bollywood film called Sadiyaan - on their fabulous show 'Love Bollywood' on the BBC Asian Network, unfortunately the film was disappointing but luckily the eggs weren't, and here's how I did them.


They started life as Smarties eggs which I took out of their bulky plastic case and re wrapped in silver foil.
Next up I encased them in crepe paper and taped around the top edge to secure.

Then my fave bit, I consulted my collection of ribbons and trims and tied the most sparkliest around each egg, then finished them off by gluing sequins and gems.

And here are the lovely lads with their Bollytastic eggs!

Monday, 22 February 2010

Easy peasy fabric printing

Why can't adults have 1/2 term, holidays? It makes so much sense to stop working every few weeks and rejuvenate. Last week was 1/2 term for many of the UK's school children. I remember my 1/2 term hols very clearly I would be bored for 4 days and then on the 5th day I would think of a huge to do list, most of it crafty and be sad I'd left it so late.

Here's a super easy project I tried out last week at a children's half term workshop, perfect for doing at home on a rainy day (and oh my, how it is raining at the minute!):

You will need:
  • Cotton fabric (in this case an apron)
  • Funky foam/neoprene
  • Card (from a cereal box)
  • PVA
  • Paper
  • Fabric paints
To make:


1. Create a template of the shape you want to print and cut it out of paper.
2. Draw around the paper shape on neoprene, cut out and glue to card.


3. Lay newspaper under your cotton to protect surface. Apply paint all over the neoprene shape careful not to get any on the card. Cover the whole foam otherwise you may get gaps.


4. Press it into position on the fabric, lift up and reveal your first print. Carry on printing until your composition is finished. You will need to apply fresh paint to the foam for each print you do.

5, Follow the instructions on the paint, when dry you normally iron the motifs to fix them so your fabric can be washed.

What a super easy method! Cheap, quick and easy...give it a go! Remember you can mix colours, print on top of shapes and go all out as wild as you wish!


Tuesday, 16 February 2010

"Mastercrafts The Book"

The postman woke me up in the early hours with two very exciting pieces of post, the book 'Mastercrafts' to accompany the new BBC Series that I am soon to be on and a picture drawn by my 4 year old niece depicting all my favourite things (Note the cupcakes and pretty dress!)

Published by the brilliant David & Charles (brilliant because they publish lots of wonderful
crafty titles) the book is celebration of the six crafts that feature in the series - stonework, thatching, woodwork, glass, metalwork and weaving. A beautiful 256 page hard back book, its a bit like an encyclopedia of the crafts in question.

The book is written by Tom Quinn, a writer and historian who knows a lot about the countryside. However this is where I started to get a bit frustrated. The book is about re-discovering British Craftmanship of which I am a passionate advocate, and despite how informative and interesting the content, the cover is atrocious. I honestly think it's one of the worst craft book covers I've ever seen (and having been the editor of a crafts magazine I have seen a lot of craft books). It panders to every stereotype you could possibly think of to do with country crafts making it extremely unappealing, if it doesn't sell well, I wouldn't be surprised if the cover is to blame. Hence this is why I have covered it up with my niece's drawing.


But of course, never judge a book by it's cover, give it a chance.......
Each chapter begins with the history of the craft exploring the origination of raw materials, how the craft has developed, going into alot of detail which makes it the ideal book for college libraries to help with research - there is information here that is impossible to find in other places.

The book also includes some photos of the trainees who took part in the TV series and interviews with the 'mastercraft' tutors. Can you spot me? Sadly from the aforementioned 256 there are just two photos of me in it (and three photos of my hands!). The day the book photographer came I was working on my own outside for 12 hours, the two shots that are in the book were 'test shots' taken in doors. But the most disappointing aspect of the whole book is the fact NONE of the trainees have their names mentioned.

In the way the that I can't understand why they chose the hideous cover, I can't understand why they haven't mentioned our names, even a simple 'thank you' in the back would have been nice. They have thanked the production company, the tutors, and Monty the presenter but not the 18 people who gave up their lives for 6 weeks to take part in the show. It's not like they didn't know our names, we all signed release forms. It's just plain mean.

And on that note my final verdict of this book is that it's an excellent resource for people who want to know more about the specific crafts in question and may be considering taking it up themselves and students who are studying crafts but with it's uninspiring cover I don't think it will appeal to today's new breed of modern hip crafter which is a real shame : (

Tuesday, 9 February 2010

Edwardian Bling

On Saturday, The Geffrye Museum held a Love Day that included some Valentines Crafting. I was asked to run a workshop for teenagers inspired by this beautiful Edwardian picture frame. It is absolutely stunning, the photo doesn't do it justice. It's totally sparkly and seems to be resin coated with gorgeous pearly shells and gold dust. I highly recommend visiting the museum to see it in person.

I came up with this concept to make your own version - participants made 'heart shaped' versions to keep with the Valentines theme but I stuck to having my own leaf frame just because I'm so in love with the original.

To make one, you will need:

  • Stiff Card
  • Black poster paint
  • PVA glue
  • Thick gold and pearly glitter (looks more like shreds rather than ordinary glitter)
  • Mirror card
1. Draw the shape of frame you want to make on the card and cut it out. You will need to use a combination of a craft knife, scissors and possibly tearing by hand to get through thick card.

2. Then cut a rectangle of card so you have two pieces of card in total.
On this smaller piece draw a window in the centre, either a square or oval like mine, large enough to fit your photo in and cut the centre piece out.

3. Draw an edge around the main frame and along the edge of the centre frame and paint these black.

4. Time to get messy. Work on the two pieces separately, coat them in thick glue and then pour on the glitter - get a full coverage by pressing the glitter into place with your fingers.

5. Cut out some shapes from mirror cards and stick these on randomly.

6. Finish with some more detail in black paint.

Voila, your own antique Edwardian frame, perfect gift for a Valentines gift, maybe for someone in your family. My frame has a very old family photo in it!

Friday, 5 February 2010

My Valentines Wishlist!

Hmmmm, with just over a week to go until Valentines Day I thought I would do a spot of online window shopping. These are the lovely homemade goodies I would like to receive if anyone out there fancies getting me a present!

Large image

I love collecting hamburger memorabilia. Last year I received a 'Ham Bag' for Valentines - a hamburger shaped handbag, this year, I quite fancy a matching hat.

My most favourite Super Hero in the world is Batman, I have a fantastic Batgirl dress made of yellow PVC it's a clubbing staple although I get very hot in it! This would be the perfect accessory to go with it!

Large image

I'm vowing to follow more recipes this year, I'm much more of a bung in a little bit of this and a little bit of that type person, I hate the restrictions of instructions. If I had a gorgeous apron like this to cook in though maybe things would be different? It's fully reversible too - amazing!

Large image